---
metadata:
- name: generator
content: Diplodoc Platform v5.63.0
alternate:
- en/security/private-embedded-objects
- ru/security/private-embedded-objects
- href: en/security/private-embedded-objects.md
type: text/markdown
title: Markdown version
csp:
- script-src:
- https://mc.yandex.ru
img-src:
- https://mc.yandex.ru
connect-src:
- https://mc.yandex.ru
- wss://mc.yandex.ru
child-src:
- 'blob:'
- https://mc.yandex.ru
frame-src:
- 'blob:'
- https://mc.yandex.ru
frame-ancestors:
- 'blob:'
- https://mc.yandex.ru
canonical: en/security/private-embedded-objects.html
title: Embedding via JWT
description: >-
In this article, you will learn how to securely embed private charts and
dashboards into a website or app.
vcsPath: en/security/private-embedded-objects.md
---
# Embedding via JWT
You can securely embed private [charts](../concepts/chart/index.md) or [dashboards](../concepts/dashboard.md) into a website or app using special [JWT token](https://en.wikipedia.org/wiki/JSON_Web_Token) links.
Embedding private objects is available only to the workbook [administrator](./roles.md#datalens-workbooks-admin).
You cannot embed private objects based on the following connections: {#unsupported-connections}
* [Metrica](../operations/connection/create-metrica-api.md)
* [AppMetrica](../operations/connection/create-appmetrica.md)
## Display parameters {#view-parameters}
To configure the features and appearance of embedded objects, you can use special parameters which you provide in the link:
* `_autoupdate`: Sets the [auto-update](../dashboard/settings.md#auto-update) time for dashboards and charts in seconds. By default, these are not updated automatically. The feature only works for the active browser tab. Objects due for auto-update on inactive tabs will be auto-updated when the tab becomes active again. The minimum values are:
* 30 seconds for dashboards.
* 15 seconds for charts.
* `_theme`: Specifies the object's appearance. The possible values are:
* `light`: Light theme.
* `dark`: Dark theme.
* `_lang`: In charts, sets the language of the menu that opens when you click . The possible values are `ru` or `en`.
Provide the parameters formatted as `=`. For example, to set the auto-update time to 50 seconds, specify `_autoupdate=50`.
Add this parameter to the object's address after the `?` character before the hash with the token. You can provide them together with [unsigned parameters](#unsigned-parameters). To provide multiple parameters, list them separated by `&` (ampersand).
## How to embed a private object {#how-to-private-embed}
1. Create a key for embedding:
{% note info %}
You can use one key to embed multiple objects.
{% endnote %}
1. In the left-hand panel, select **Collections and workbooks**.
1. Open the workbook with the object you want to embed.
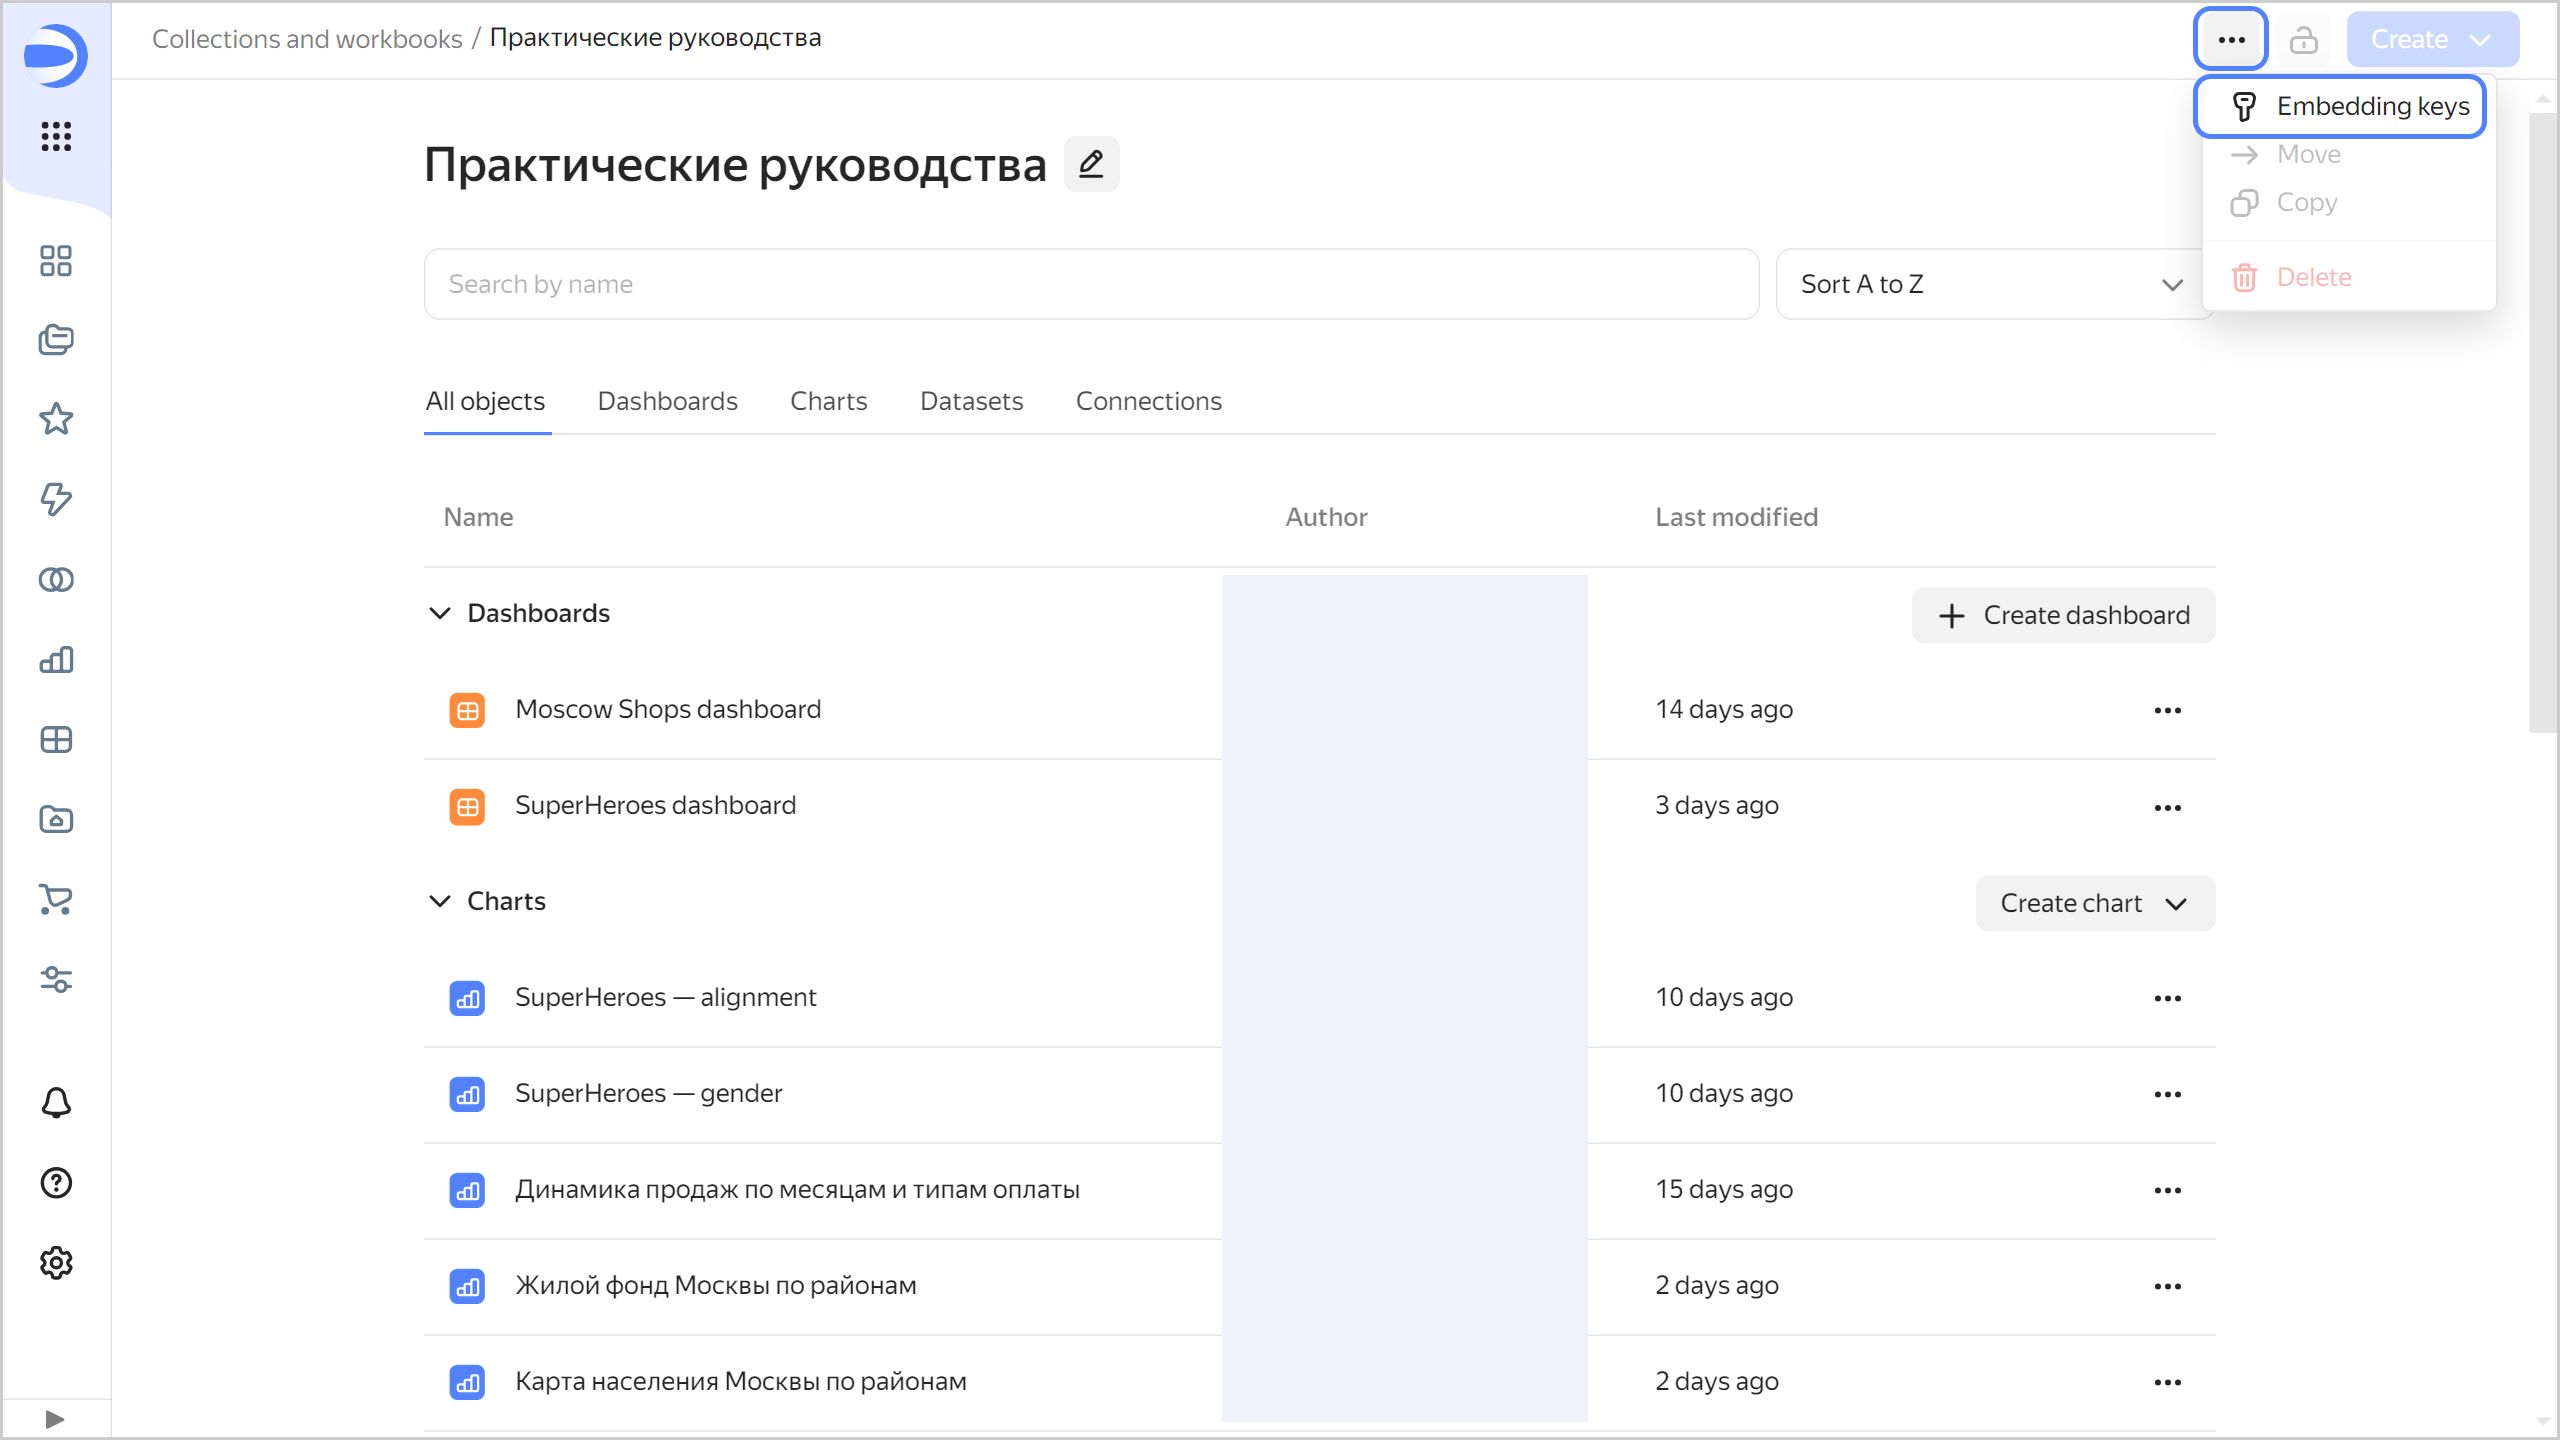
1. At the top of the screen, click and select **Keys for embedding**.
1. In the window that opens:
1. Click **Create key**.
1. Enter the key name and click **Create**.
1. At the bottom, click **Download key file** or copy the key value.
{% note warning %}
After you close the window, all data from it will be lost.
{% endnote %}
The new key for embedding will appear in the list.
1. Configure the embedding for a private object:
{% note info %}
You can configure multiple embeddings for each object.
{% endnote %}
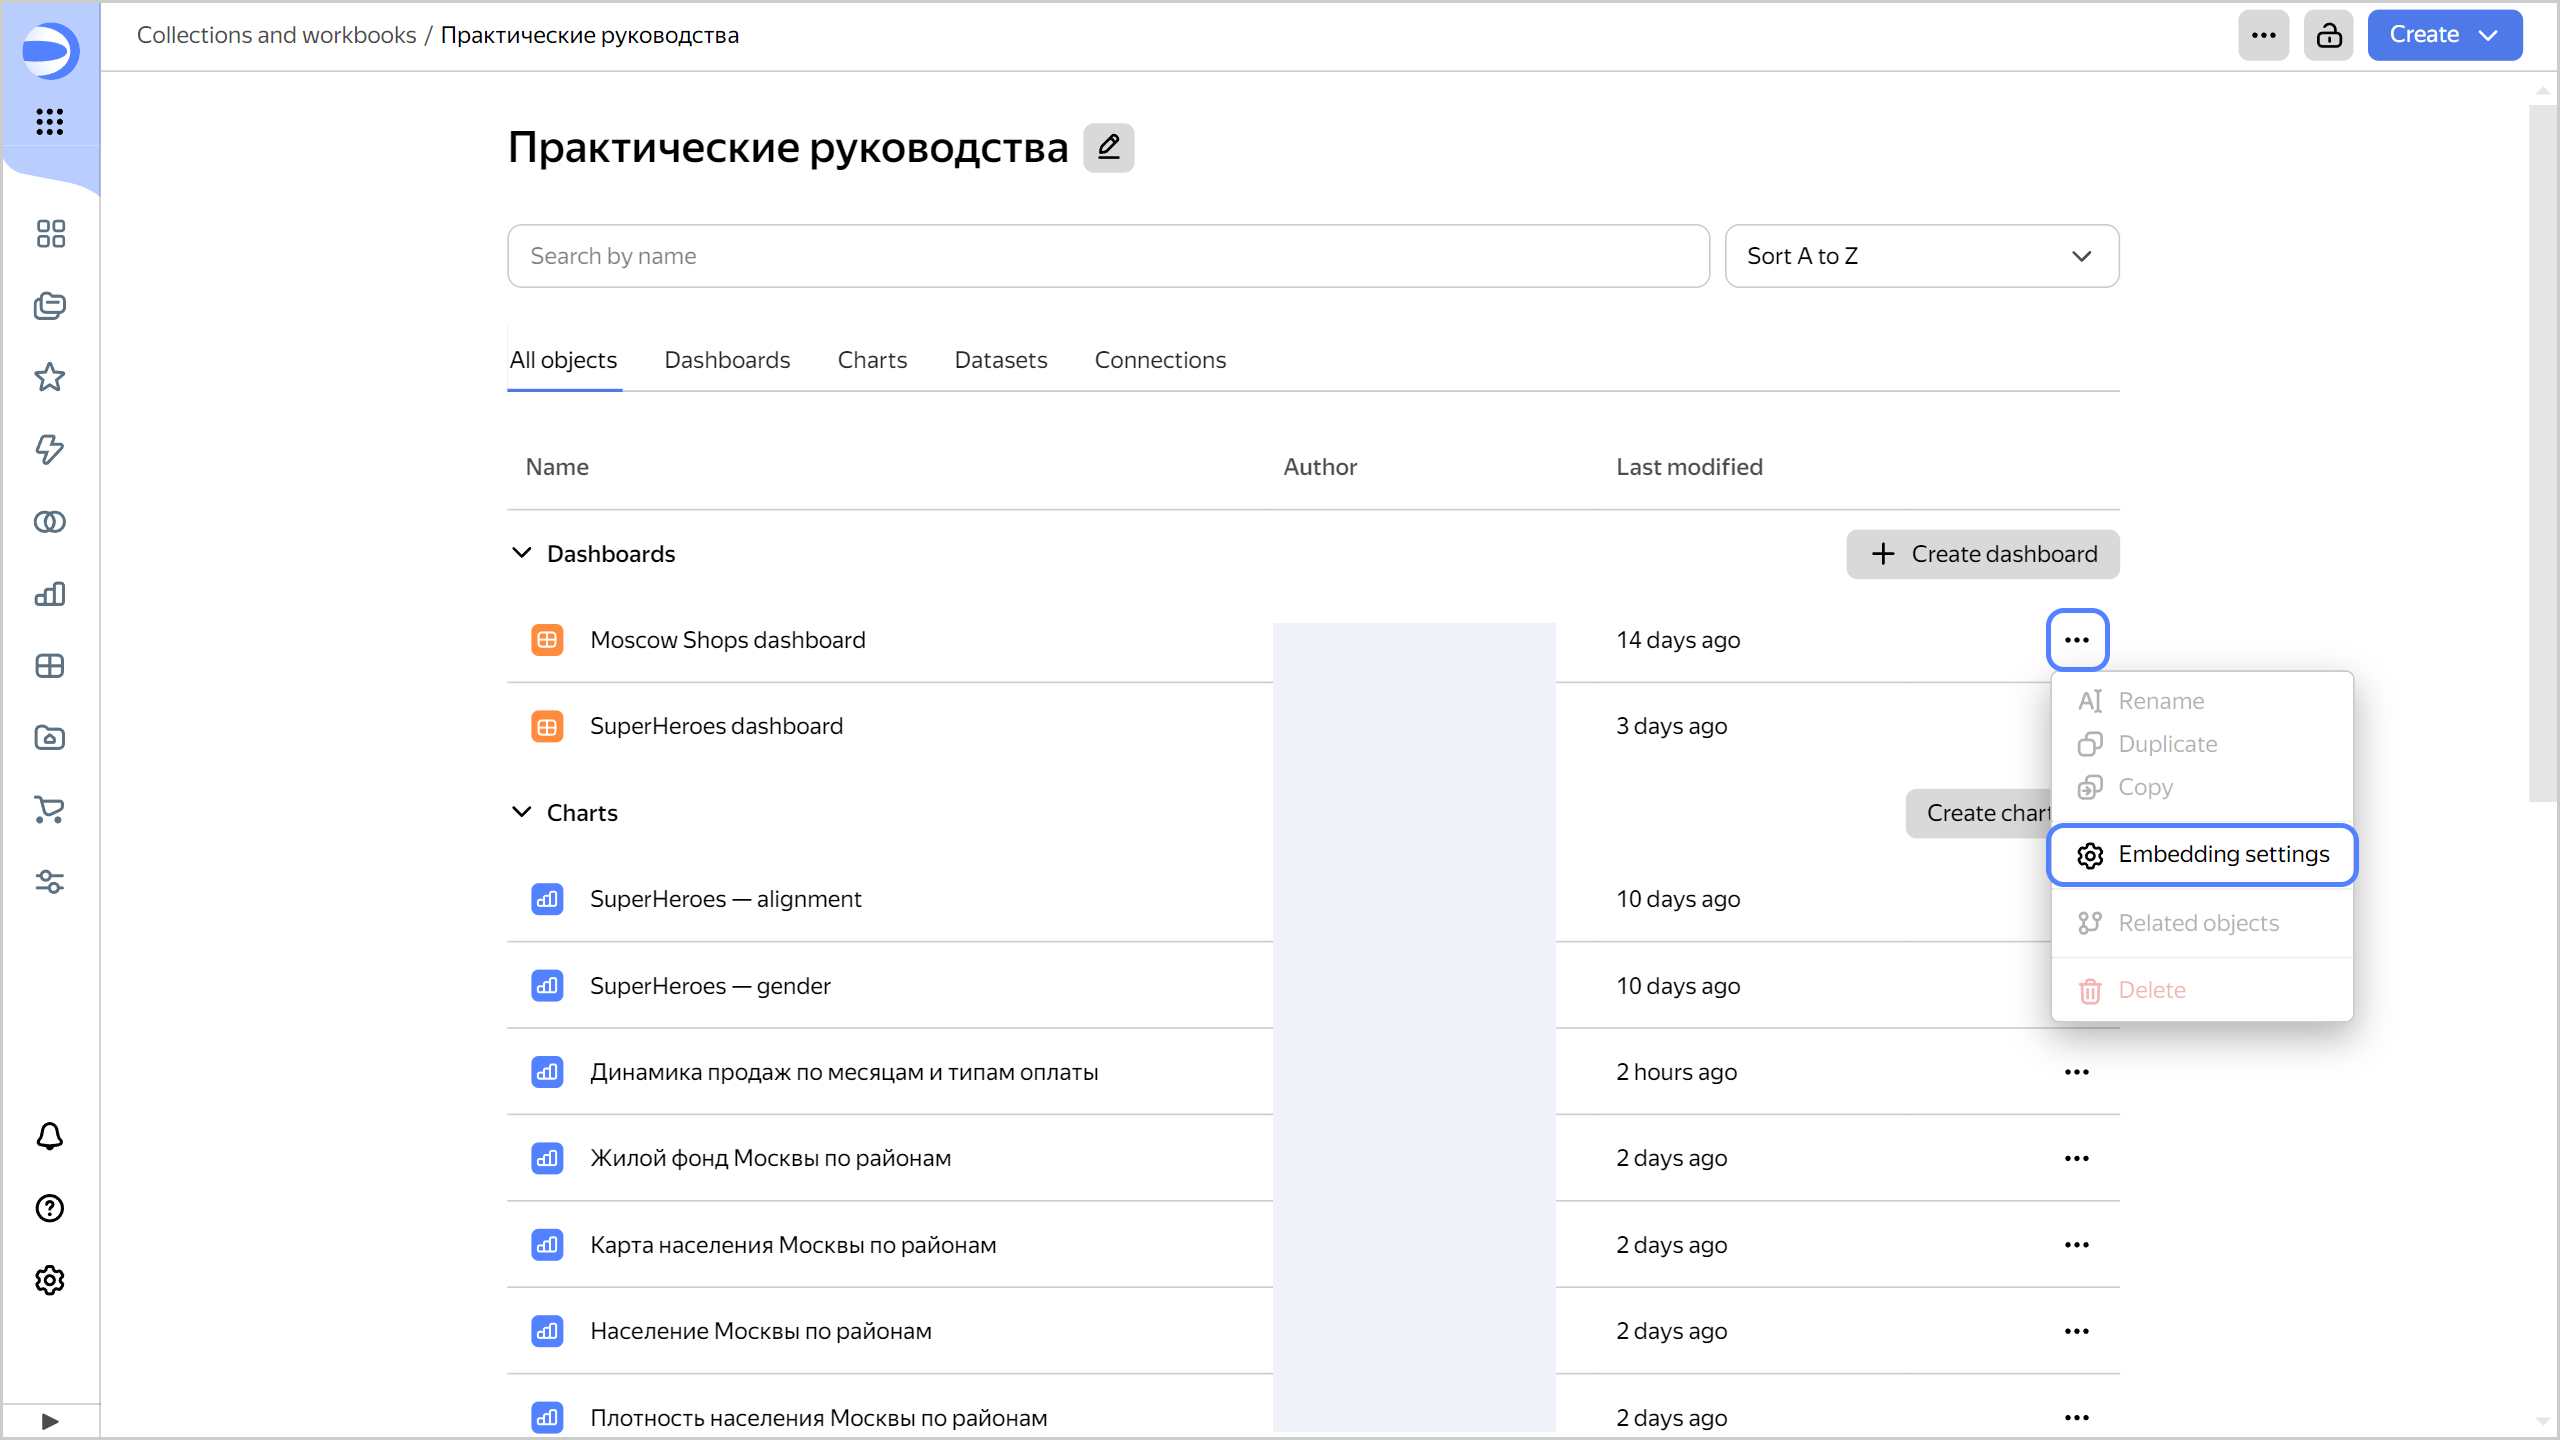
1. In the row with the object, click and select **Embedding settings**.
1. In the window that opens, click **New embedding**.
1. In the settings window, specify:
{% list tabs group=datalens_public %}
- For a chart {#chart}
* **Name**: Enter a name for the embedding.
* **Key**: Select a previously created key for embedding.
* Select **Default parameters**:
* **Enable all** (default): All the [unsigned parameters](#unsigned-parameters) are enabled, unless explicitly disabled.
* **Disable all**: All the unsigned parameters are disabled, unless explicitly enabled.
These restrictions do not apply to [signed parameters](#signed-parameters) from the token.
* Optionally, **Disabled parameters**: Specify the names of unsigned parameters you want disabled when embedding a chart. Available in **Enable all** mode.
* Optionally, **Enabled parameters**: Specify the names of unsigned parameters that can be provided in the embedding link. Any parameters not specified in the list will be ignored when attempting to provide them in the embedding link. Available in **Disable all** mode.
* Optionally, **Allow data export**: Enable the display of the menu that allows you to export the chart data. To export data, hover over the chart, click → **Save as** in its top-right corner, and select the format: `XLSX`, `CSV`, or `Markdown`.
- For a dashboard {#dashboard}
* **Name**: Enter a name for the embedding.
* **Key**: Select a previously created key for embedding.
* Optionally, **Disabled parameters**: Specify the names of [unsigned parameters](#unsigned-parameters) you want disabled when embedding a dashboard. These restrictions do not apply to [signed parameters](#signed-parameters) from the token. By default, you can provide any parameters in the embedding link. If they are [specified](../operations/dashboard/add-parameters.md) in the dashboard settings, they can affect charts and selectors.
{% note info %}
If there are selectors with restricted parameters on the dashboard, those will not be available when embedding.
{% endnote %}
* Optionally, **Allow data export**: Enable the display of the menu that allows you to export the chart data. To export data, hover over the chart, click → **Save as** in its top-right corner, and select the format: `XLSX`, `CSV`, or `Markdown`.
{% endlist %}
1. Click **Create**. In the **ID** column, copy the ID of the object to embed, and then click **Close**.
1. Create a token:
1. Prepare a payload for the token, i.e., information about the object to embed. The payload contains the following fields:
* `embedId`: ID of the object to embed.
* `iat`: JWT issue time in [Unix Timestamp](https://en.wikipedia.org/wiki/Unix_time) format.
* `exp`: Token expiration time in Unix Timestamp format.
{% note warning %}
Tokens with more than 10 hours between `exp` and `iat` are invalid.
{% endnote %}
* `dlEmbedService`: Service ID string constant, `ENTERPRISE_DATALENS_EMBEDDING_SERVICE_MARK`.
* (Optional) `params`: Signed chart parameters provided as part of the token. They cannot be changed without regenerating the token.
{% note warning %}
* The generated token is transmitted as part of the network request header, so its maximum size is limited to 30 KB. Keep this in mind when using signed parameters.
* For correct operation, use only a string or an array of strings as parameter values.
{% endnote %}
Here is an example:
```json
{
"embedId": "ieez7********",
"iat": 1516239022,
"exp": 1516240822,
"dlEmbedService": "ENTERPRISE_DATALENS_EMBEDDING_SERVICE_MARK",
"params": {
"param1": "value1",
"param2": "value2"
}
}
```
1. To create a JWT token, sign the prepared payload with the private key you got earlier when creating the key for embedding.
{% note info %}
Use the `PS256` algorithm when creating the JWT.
{% endnote %}
To create a JWT token, use these code samples:
{% list tabs group=programming_language %}
- Python {#python}
Install `cryptography` for working with `PS256`:
```bash
pip3 install cryptography
pip3 install PyJWT
```
{% note info %}
For correct operation, use PyJWT version 2.0.0 or higher.
{% endnote %}
Run the following code:
```python
import time
import jwt
import json
private_key = b""""""
now = int(time.time())
payload = {
'embedId': "",
'dlEmbedService': "ENTERPRISE_DATALENS_EMBEDDING_SERVICE_MARK",
'iat': now,
'exp': now + 360,
"params": { }}
# JWT generation.
encoded_token = jwt.encode(
payload,
private_key,
algorithm='PS256',
)
print(encoded_token)
```
- Node.js {#node}
Install the [jsonwebtoken](https://github.com/auth0/node-jsonwebtoken) package using [npm](https://www.npmjs.com/):
```bash
npm install jsonwebtoken
```
Run the following code:
```js
const privateKey = ``;
const now = Math.floor(Date.now() / 1000);
const payload = {
embedId: '',
dlEmbedService: 'ENTERPRISE_DATALENS_EMBEDDING_SERVICE_MARK',
iat: now,
exp: now + 360,
params: {},
};
const jwt = require('jsonwebtoken');
const encodedToken = jwt.sign(payload, privateKey, {
algorithm: 'PS256',
});
console.log(encodedToken);
```
- Go {#go}
Install the [jwt-go](https://github.com/golang-jwt/jwt) package:
```bash
go install github.com/golang-jwt/jwt/v5@latest
```
Run the following code:
```golang
package main
import (
"fmt"
"time"
"github.com/golang-jwt/jwt/v5"
)
func main() {
privateKey, err := jwt.ParseRSAPrivateKeyFromPEM([]byte(``))
now := time.Now().Unix()
payload := jwt.MapClaims{
"embedId": "",
"dlEmbedService": "ENTERPRISE_DATALENS_EMBEDDING_SERVICE_MARK",
"iat": now,
"exp": now + 360,
"params": map[string]interface{}{},
}
token := jwt.NewWithClaims(jwt.SigningMethodPS256, payload)
signedToken, err := token.SignedString(privateKey)
if err != nil {
fmt.Println("Error generating token:", err)
return
}
fmt.Println(signedToken)
}
```
{% endlist %}
1. Generate an embedding link:
{% list tabs group=datalens_public %}
- For a chart {#chart}
```bash
/embeds/chart#dl_embed_token=
```
Where:
* ``: Your corporate DataLens domain, e.g., `https://enterprise.datalens.net`.
* ``: JWT.
- For a dashboard {#dashboard}
```bash
/embeds/dash#dl_embed_token=
```
Where:
* ``: Your corporate DataLens domain, e.g., `https://enterprise.datalens.net`.
* ``: JWT.
{% endlist %}
1. Add the embedding link to your website or application. Here is an example:
{% list tabs group=datalens_public %}
- For a chart {#chart}
```html
```
Where:
* ``: Your corporate DataLens domain, e.g., `https://enterprise.datalens.net`.
* `src`: Embedding URL.
* ``: JWT.
* `width`: Chart width.
* `height`: Chart height.
* `frameborder`: Chart border (yes or no).
- For a dashboard {#dashboard}
```html
```
Where:
* ``: Your corporate DataLens domain, e.g., `https://enterprise.datalens.net`.
* `src`: Embedding URL.
* ``: JWT.
* `width`: Dashboard width.
* `height`: Dashboard height.
* `frameborder`: Dashboard border (yes or no).
{% endlist %}
{% note info %}
If the website and app your chart or dashboard will be embedded into have a whitelist-based access policy, add `` to the whitelist.
{% endnote %}
## Updating a token without losing your filter states {#token-update}
Replacing a JWT in an embedding link resets filters on the embedded dashboard to their default values.
To update the embedding link without losing filter states, use the [postMessage](https://developer.mozilla.org/en-US/docs/Web/API/Window/postMessage) method.
To update a JWT in a link, send an object of the following type to `iframe` using the `postMessage` method:
```js
{
type: 'SECURE_EMBEDDING_TOKEN_UPDATE',
token:
}
```
Where `` is your updated JWT.
As a result, queries from your dashboard or chart will be signed with the new token. The dashboard or chart will automatically get updated if you changed the signed parameters in your new token.
Here is an example:
```js
const iframe = document.getElementById('ID_IFRAME');
iframe.contentWindow.postMessage({
type: 'SECURE_EMBEDDING_TOKEN_UPDATE',
token: 'NEW_TOKEN'
}, '/');
```
When updating a token, keep in mind its expiration time.
## Unsigned parameters {#unsigned-parameters}
By default, any parameters, except those explicitly disabled, can be provided in the embedding link. They should be specified in the URL before the token hash. This allows you to change some widget/dashboard parameters on the client side without recreating the token.
For example, where a chart or dashboard employs the `from` and/or `to` parameters to filter values by time, you can provide these parameters in the embedding link before the token hash:
{% list tabs group=datalens_public %}
- For a chart {#chart}
```html
```
Where:
* ``: Your corporate DataLens domain, e.g., `https://enterprise.datalens.net`.
* `src`: Embedding URL.
* ``: JWT.
* `from=2022-01-01&to=2023-02-05`: Unsigned parameters.
- For a dashboard {#dashboard}
```html
```
Where:
* ``: Your corporate DataLens domain, e.g., `https://enterprise.datalens.net`.
* `src`: Embedding URL.
* ``: JWT.
* `from=2022-01-01&to=2023-02-05`: Unsigned parameters.
{% endlist %}
In the embedding link, any unsigned parameters are ignored if:
{% list tabs group=datalens_public %}
- For a chart {#chart}
* The parameter is blacklisted in **Enable all** mode.
* The parameter is not whitelisted in **Disable all** mode.
- For a dashboard {#dashboard}
The parameter names are blacklisted.
{% endlist %}
## Signed parameters {#signed-parameters}
Signed parameters are provided as part of the token. They cannot be changed without regenerating the token. For correct operation, use only a string or an array of strings as parameter values.
Embedding settings for enabled and disabled parameters do not apply to signed parameters. They will be provided to charts and selectors in any case.
You can dynamically update signed parameters by [refreshing a token without losing filter states](#token-update).
When working with parameters:
* Signed parameters take priority. If a widget gets both a signed and an external parameter of the same name at the same time, the signed one will apply.
* Signed parameter selectors do not affect the dashboard charts.
Signed parameters ensure more secure data access: users with access to embedded objects are unable to change these parameters. You can use signed parameters to filter charts and provide a specific user with only the slice of data they need.
## Recommendations {#recommendations}
When embedding private objects, follow these guidelines:
* Default values should be provided in the link parameters.
* Note that any parameter in the link will override any signed parameter of the same name.
* To make it uneditable, add the [signed parameter](#signed-parameters) to a token.
## Things to consider when embedding dashboards {#dash-embed-specialties}
When embedding dashboards, consider the following:
* Embedded dashboards can be opened only in view mode. Their navigation bar and, by default, the menu for charts are hidden. Enable **Allow data export** in embedding settings for your charts to display the menu, which allows exporting the chart data.
* When you open a dashboard, its [settings](../dashboard/settings.md) apply.
* For unsigned parameters to work correctly, [specify them](../operations/dashboard/add-parameters.md) in the dashboard settings.
* Unsigned parameters work in the same way as regular [parameters in a dashboard link](../dashboard/dashboard_parameters.md#params-in-url).
* You cannot provide the state of filtered charts in the `state` parameter.
* The embedding link may not contain a dashboard header.
* In the embedding link, use `tab` to specify the tab to open the dashboard on.